
Add Custom Fields & Sections
About the Field Editor
Applies to: All ONTRAPORT accounts.
The field editor is where you can create, edit, and delete fields and sections in the Contact Records. This area allows you to edit field names, edit field types, rearrange fields to display in different sections, and rearrange sections to display as you wish. Sections can also be dragged and dropped into tabs. Anything you edit, create or delete in the field editor will have to be saved using the Save button at the top right.
Field Editor Location
The field editor is found in the Navigation bar > Contacts menu > Settings > Field Editor

What are Fields?
Fields are where your contact’s data is stored. By default, ONTRAPORT houses dozens of fields for you to utilize. You can create custom fields and rearrange them between sections.
How to Arrange Fields
You can rearrange fields within a section in the Field Editor, or move them into a different section. This is done by clicking and dragging the move icon and placing the field to the desired location.

How to Add and Delete Fields
You can add custom fields and delete them from the Field Editor.
To delete fields, click the trash can icon next to the field and type DELETE when prompted. When a field is deleted, the data in those fields is deleted from all Contact records.
To add fields:
- Navigate to Contacts > Settings > Field Editor
- Click the + Add Field button
- Name the field. Create names of your fields with enough information that you recognize it but not so long that it's hard to read in your database. You can change the display label of a field on a form so name the field with For example, you might name a field as "Testimonial Rating" but on the form, you might label it as "How would your rate our service?".
- Select a field type. The field type defines what type of data that field accepts.
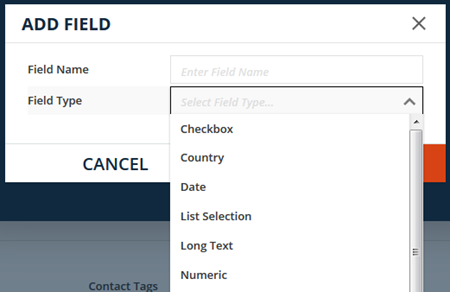
Field Types
- Checkbox - Checkbox for yes and no values.
- Country - Dropdown list for Countries
- Date - Calendar box to select date.
- List Selection - List of multiple values; allows selection of one or more.
- Long Text - Text field for long descriptions.
- Numeric - Field for whole numbers only.
- Price - Field for entering a price.
- Phone - Field for phone numbers.
- State - Contains a list of states and regions.
- Dropdown - Dropdown list of multiple values allowing the selection of one of the values.
- Color - Dropdown list of multiple values allowing the selection of one of the values and color
- Text - Field for alpha-numeric values such as proper names, serial numbers, etc.
- Email - Field for email address.
- SMS - Field for a phone number that can receive SMS messages.
- Address - Field for a street address.
Unique and Required Fields
If your account has Custom Objects enabled, the Add Field dialog box will include the ability to set the custom field to Unique and/or Required.
- Marking a field Unique will result in the field not accepting any value duplicated in another Contact Record. This is commonly used for things like unique serial numbers. ONTRAPORT treats these fields in a special way. It cannot be modified through automation in a Campaign, Rule, Sequence, or through a Group Action. Importing values into the field can be complicated because an empty field will be evaluated as a duplicate of other empty fields and the records will be merged during import.
- Marking a field Required will prevent writing the Contact Record if the field is not populated. Take special care that any field marked Required is also required on every opt in form, order form, API call, etc. that can write a new Contact Record. We recommend not making fields Required except in very special, limited circumstances.
Sections for Fields
Sections are a group of fields in the contacts collection. Sections are used for categorizing fields and grouping similar fields together. This allows you to keep data such as contact information separate from purchase information. Sections can also have descriptions which can be edited or deleted when clicked on.

How to arrange sections
Rearrange sections by clicking on the move icon and dragging the section in between 2 other sections or to another tab. This enables you to view one section of fields before another in the contact record.

How to add and delete sections
You’re able to add new sections with new fields or existing fields. To add a new section, simply click on + Add New Section at the bottom of the field editor. You can also click + Add Tab in the upper right to add a new section within a new tab.
Permissions in Sections
Set permissions to each section so only certain users in your account can view or edit the fields within that section. To set permissions, click the P icon next to the section name.

Field Section Tabs
Tabs are used to house and organize your sections. Multiple sections can be placed into one Tab and you can move sections from one Tab to another with ease as well as rearrange the order of your Tabs. If the width of your screen cannot accomodate all the Tabs a drop down menu will be used to allow easy selection of the Tabs.

How to arrange tabs
Rearrange tabs by clicking the move icon and dragging the tab next to or between other tabs.
How to create a tab
You can create a new blank tab by clicking the + Add Tab button. Once a tab is created, you can create new sections within them or drag existing sections from other tags into it.
Maximum Number of Fields
The maximum number of fields you can add depends on the field type and it's data usage. The industry standard for database records allows up to 65,535 bytes of data and up to 4,096 fields in each record. The ONTRAPORT default fields take up approximately 25,924 bytes, leaving about 39,611 bytes available. While usually not the limiting factor, after the default and system fields are added there are about 4,000 remaining fields left. The following data types and their data usage is listed below:
- Checkbox: 1
- Date: 20
- List Selection: 20 * Number of items in list
- Long text: 8
- Numeric: 20
- Price: 64
- Phone: 768
- State: 768
- Dropdown: 20 * Number of items in list
- Color: 20 * Number of items in list
- Text: 768
- Email: 768
- SMS: 768
- Address: 768
Estimating Data Limits
List your custom fields and the data type with the corresponding byte count for that data type. Added together, they should not exceed about 39,611 bytes (there is some overhead per field used, so your actual limit may be a few bytes per field less than the 39,611 bytes).
Mitigating Data Limitations
Using the most data intensive fields, those that take 768 bytes, you can add a total of 51 fields (39,611 / 768 = 51). Note that a long text field takes only 8 bytes, and can be used in place of regular text fields. The long text field is a pointer to an external record with the text in it, saving space in the database. Because the data is fetched from another database there is a performance penalty, and we don't recommend trying to add hundreds of long text records to your database.
In cases where the Field Editor has warned about data limits, you can convert your text fields to long text. Because the long text field can hold at least 20,000 characters you will not lose data by changing the field type. You can convert a text field to long text by simply editing the field. Note that you cannot convert the field back to a regular text field and a long text field cannot be used as a column heading in a list view.
In addition to choosing the fields to convert to long text, you can have Support submit a ticket to convert all your custom text fields to long text. Because long text fields are stored in another database there may be a performance penalty in fetching the data. ONTRAPORT can also trim fields, shortening the 256 character limit in text fields to a shorter length, such as 150 characters. Note that data in these fields are truncated at the trimmed point, losing the data after that point in the field.
FAQs
Q. I have a specific question about adding fields that is not covered in the article. Where can I get a quick answer?
A. Check at the ONTRAPORT Q & A Forum at any time. During Support hours, select the help menu at the top right of the app and click on Chat to ask our Support team for assistance. If you cannot access your account, you can enter a support chat from the ONTRAPORT home page.
Articles in this section
- Contact Management Overview
- Importing Contacts
- Best Practices for Preparing a CSV File for Import
- Contact Management Segmentation (Groups)
- Contact Tags
- Add Custom Fields & Sections
- Card View for Contacts and Custom Objects
- Card View - Using the Color Field
- Converting to Card View
- Card View Quick Reference
How do you edit a field like "Lead Source"?
I knew how to do it in the old version. It's not clear here.
"Lead Source" is one of the UTM parameter fields; you have to create the "Lead Source" value in Tracking > By Lead Source section first. Then the option will appear when you go to edit the individual contact record.
The other UTM parameter fields are "Campaign", "Medium", "Content" and "Term" in that same section of the Contact Record. For more on the UTM parameters see https://support.ontraport.com/entries/22821130-Marketing-Tracking-Overview
The field editor is really hard to find. Can you maybe add a link to it on the account administration page?
A couple of comments relating to the self-serve "manage your subscription" function and associated field descriptions:
Is it possible to add/remove/edit the fields that appear on the "Your Subscription Pages"?
Is it possible to edit field descriptions in the Contact Information tab. The reason I ask is that we have global contacts who live in countries with provinces and postal codes (not states and zip codes). I'd like to change the field descriptions to something along the lines of Zip/Postal Code and State/Prov