Post

2 followers Follow
0
Avatar

How Can I Capitalize the Names in my Contact Records?

Partners Team

ONTRAPORT doesn't have an "automatically capitalize names" feature, and a lot of my contacts are using all lower case when they opt in on mobile. Other than individually editing each record, is there a way to get contact names capitalized?

Answered

Official comment

Avatar

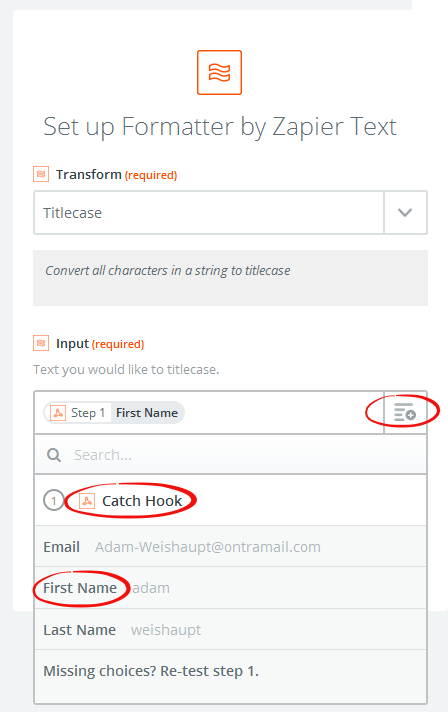
You can now format the output of merge fields, allowing you to display the Contact Record fields as capitalized (without changing the underlying data!)  See our article on Formatting Merge Fields for more information. 

Frank Hagan
Comment actions Permalink

Please to leave a comment.

2 comments

0
Avatar

You can use Zapier to update your Contact Records if you want to actually change the data stored there to be capitalized. We usually recommend leaving the data as is and formatting the output when used in merge fields, but some clients may have to regularly export Contacts or use an API to merge them with other systems, and want to know how to automate changing the data.  A Rule, either as a step in a Step Sequence or a global Rule triggered by something else, can send the Contact first name, last name and email address to Zapier and Zapier can update the Contact Record with the capitalized name. The instructions below work for the free version of Zapier and uses two "Zaps"; you can combine the steps into a single Zap if you have a paid version of Zapier.

  1. Create a Zapier account (the free level is fine)

  2. Connect ONTRAPORT to Zapier

  3. Create a Zap in Zapier. For the "Trigger" search for and select "Webhooks by Zapier"


  4. On the next screen select "Catch Hook"

  5. Leave the "Pick off a child key" screen blank and click "Continue"

  6. Copy the webhook URL by clicking the "Copy to clipboard" button.


  7. Open ONTRAPORT in another tab and create a Step Sequence. Name it "Zap - Capitalize First and Last Name"

  8. Add a Rule Step and use the default settings. Under "Then Do This" select "Ping a URL"

  9. Paste the webhook URL into the "URL" field


  10. In the Post Data box, type the following: 

    Email=[Email]&First Name=[First Name]&Last Name=[Last Name]

  11. If you have the paid version of Zapier, you can save this Step Sequence, and you're done. The paid version will allow you to send one Ping URL and have multiple steps in a Zap to extract the Post Data. If you are using the free version we need two Zaps with two different Webhooks; we will assume the free version for now and will test using just the first name. Save the Step Sequence.

  12. Select a Contact that does not have a capitalized first name and open the Contact Record (click on the name). Navigate to the Sequences section (usually on the Contact Information tab). Don't add the Step Sequence to the Contact just yet.

  13. Return to Zapier and click the "Continue" button. In the "Pick off a Child Key" screen just click "Continue". The next screen will ask you to send a webhook to Zapier for testing.

  14. Return to ONTRAPORT and add the Step Sequence "Zap - Capitalize First and Last Name" to the Contact. 

  15. Return to Zapier and wait a few seconds. Zapier will declare success and provide a link to view the Post Data the Ping URL has sent them. Click it and see if the contact email, first name and last name appear (they will still be lower case at this time). 


  16. Click "Continue" and add another step to the Zap. This will be an Action step. For the app, search for "Formatter by Zapier". On the "Select Formatter by Zapier Action" select "Text" and click Continue.


  17. If asked, choose the action "Transform". In the "Transform" drop down, select "Titlecase". In the "Input" section click "Catch Hook" to expand it and select "First Name".


  18. Click "Continue" and you can see how the first name will be capitalized when the Zap is live by clicking the text link "view your text". 

  19. If you have the paid version of Zapier, add another Action step, and select "Formatter  by Zapier" again. Repeat steps 16 and 17 choosing "Last Name" for step 17. Then continue with step 20.

  20. Add another Action step and select ONTRAPORT as the application. Choose "Create or Update Contact" as the action. Select your ONTRAPORT account if necessary. 

  21. In the "Edit Template" step click the drop down next to "Email" and click on the "Catch Hook" option. Select "Email".


  22. If you are using the paid version of Zapier, and created the second "Formatter by Zapier" step in step 19, select the drop down next to "Last Name" and click on one of the "Text" steps to see if it contains the Last Name. If not, click on the other "Text" and select the "Last Name" (see image below for how it looks). 

  23. Click the drop down next to "First Name" and click on the "Text" step to expand it. Select "First Name". 


  24. Scroll down to the bottom and click "Continue". Activate your Zap.

  25. In ONTRAPORT, test the action of the Zap by unsubscribing your Contact to the "Zap - Capitalize First and Last Name" sequence and re-adding them. In a few minutes, refresh the Contact Record screen and you should see the first name is capitalized (both first and last will be capitalized if you have the paid version and used two "Formatter by Zapier" steps in the Zap). 

  26. If successful, and you don't have the paid version of Zapier, create another, separate Zap using a new Webhook, and copy the webhook URL.

  27. Return to ONTRAPORT and edit the "Zap - Capitalize First and Last Name" Step Sequence. Add a new Rule step, and select "Ping a URL" as the action. Paste the new Zap webhook URL into the URL field. In the Post Data box, type the following: 

    Email=[Email]&First Name=[First Name]&Last Name=[Last Name]

  28. Repeat steps 11 through 24 to configure the second Zap to capitalize the last name. Save the Step Sequence with the second Rule step, and subscribe another test contact to the Sequence. 
Frank Hagan 0 votes
Comment actions Permalink