
Migrating to ONTRAPORT from Another Platform
About Migrating from Another Platform
Applies to: All ONTRAPORT accounts. ONTRAPORT Plus and above recommended.
Once you've made the choice to switch to ONTRAPORT from another contact management/email marketing platform, transferring all of the information from the previous platform is necessary to take full advantage of the suite of features ONTRAPORT provides. If you are migrating from a basic CRM and Email marketing platform, this article covers the steps we recommend for a successful migration.
The first step is to get all new contacts flowing into ONTRAPORT. This prevents rework of exporting/importing over and over again to catch up with two systems running simultaneously. To accomplish this, recreate your webforms (or landing pages), the related automations and email messages. Once all new contacts are flowing into ONTRAPORT, export from the old system and import into ONTRAPORT.
Follow the steps below to successfully move from your previous platform to ONTRAPORT.
- Recreate webforms and/or landing pages
- Recreate email templates and messages
- Recreate automated processes (e.g. autoresponders)
- Export contacts/lists from your previous system
- Import your newly exported contacts into ONTRAPORT
- Create segmented groups
Recreate Your Webforms Using ONTRAforms
Use this technique to create an opt in form for your website to replace your current webforms. You can create static forms of any width, pop up forms, or "click to pop up" forms easily. To create a stand-alone landing page with an opt in form follow the instructions under Recreate Your Webforms Using ONTRApages.
- Click Contacts > Forms and click the New Form button.
- Click Create New in the ONTRAform icon. The currently Featured Templates will load. Click the View by Type section in the Palette on the left and the Lead Capture templates will load.
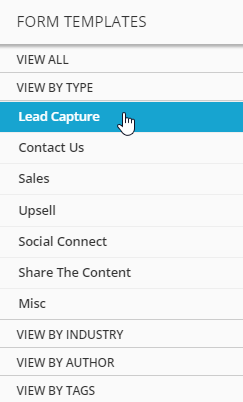
- Choose any form template you like. For this tutorial, we are using the Ignite template.
- The template loads in the Canvas in a true what-you-see-is-what-you-get format. For the full information on designing and editing ONTRAforms, see our separate article on ONTRAforms. For this tutorial we will focus on editing the Smart Form, the opt in form portion of this template.
- Name the form at the top left. The name is only used within ONTRAPORT, and we recommend using a naming convention to help identify the form's purpose later. You can use prefixes such as WSOI: for "Web Site Opt In" for example.
- Click on Smart Form in the Palette to select it for editing then click Form.

- The form fields are displayed in the Palette. In the Ignite template there is a Last Name field that is greyed out and has a red slider icon next to it. If the form you're recreating has the Last Name exposed, click the red slider icon to un-hide the last name field on the template.

- If you want to add more fields to this form than the chosen template contains, click the + Add button.
- Click on the First Name or any other field name in the Palette to expose the editing options for the field. Take note of the following:
- Label: the label is what the field is called on the form. The Last Name field could be called Surname on the form.
- Placeholder: puts the field name inside the field rather than above it.
- Required field: Check it for any fields you had required on the original system's form.
- Remember to click the Save button after editing each field.
- When finished editing the form fields, click the Done button in the Palette to return to Smart Form editing in the Palette. Edit the Button if desired.
- Click the Form Settings gear icon to load the Form Settings dialog. This is where you will edit any backend automation that happens once the form is filled out.

- ONTRAPORT has several options for each section on the Form Settings dialog. For this tutorial, we will accept the default Single opt in under Opt-In Settings, with the Default Thank You Page (the Thank You page is the page your leads will see after filling out your form). You can return here later to change these options. You can learn more in our Opt-In Settings article.
- In the Palette, click Done to return to the Blocks on This Form view.
- At the upper right, click the Publish button. The Publish ONTRAform dialog appears.
- Under Select Your Display Type choose how you want the form to appear.
- Automatic Lightbox is a pop up form that has several options in step 2 to control how it is triggered and the placement on the page. You can pop up the form after the page loads, when the user scrolls a certain amount of the page, or when their cursor heads toward the "back" or "x" buttons (called "exit intent").
- Embed in Page provides a static display of the form on the page without any kind of pop up activity. This is a good choice if you are dedicating an entire page to your opt in.
- Click to Pop Lightbox provides a link to click to opt in. This option allows you to put a link anywhere on the page, including in a narrow sidebar, and have the full form pop up.
- After configuring your form's display options step 3 has the code you can copy to insert into your webpage.

- Follow the instructions in the section below called "Recreate Your Automated Processes Using the Campaign Builder" before inserting your form code on your website.
Recreate Your Webforms Using ONTRApages
Use this technique to create stand alone landing pages with opt in forms. To create standard webforms for replacing the ones existing on your website, see Recreate Your Webforms Using ONTRAforms.
- Click on Sites > Landing Pages in ONTRAPORT and click the New Landing Page button.
- Click the Create New button in the ONTRApages icon. Selected Landing Page Templates will load. Click the View By Type section in the Palette on the left and the Lead Capture templates will load.

- Many templates are free and are labeled as such. Some templates are created by designers who allow you to use them in exchange for your email address, or for a small fee, as indicated on the template thumbnails. For this tutorial, select the free Horizon template.
- The template loads in the Canvas in a true what-you-see-is-what-you-get format. For the full information on designing and editing ONTRApages see our separate article on ONTRApages. For this tutorial we will focus on editing the blocks on this page.
- Start by naming the page in the upper left. This name is used internally only to identify this page, and is not shown to your Contacts. We recommend using a naming convention that makes sense to you. A common method is to use a prefix for the type of page, such as LC: for "Lead Capture", and then a description of the page.
- The Palette displays the Blocks On This Page view. Our first task is to move the Smart Form block up under the banner. Click and drag Smart Form up and drop it under Banner in the Palette.

- We want to simplify this page, so we'll be hiding several blocks. Hover over Text, Testimonial and Divider and click the green Toggle Visibility icon to turn it red, and hide the blocks.

- Edit the Banner block. You can click Banner in the Palette to edit it, or hover over the banner in the Canvas and click Edit. Hide the Button by hovering over it in the Palette and clicking the Visibility Toggle. Edit the Header and Sub-Header as needed. When finished with each one, click Save in the Palette.
- When done editing the text, click blue Done button to return the Palette to the Blocks On This Page view.
- Click on the Smart Form to edit it and then click Form.
- The form fields are displayed in the Palette. You are able to add more fields by clicking the + Add button, similar to the form you just created.
- Click on the First Name field name in the Palette to expose the editing options for the field. ONTRApages use the Material Design standards set by Google for color, font and size choices. We recommend you use our options in order to ensure your form looks good on all devices. Take note of the following:
- Label: the label is what the field is called on the form. The Last Name field could be called Surname on the form.
- Placeholder: puts the field name inside the field rather than above it
- Required field: Check it for any fields you had required on the original webform.
- Remember to click the Save button after editing each field.
- When finished editing the form fields, click the Done button in the Palette to return to Smart Form editing in the Palette. Edit the Button if desired.
- Click the Form Settings gear icon to load the Form Settings dialog.
- ONTRAPORT has several options in each section of the Form Settings dialog. For the purposes of this tutorial we'll accept the default Opt-In Settings of Single opt in and the Default Thank You Page. You can return and edit these later.
- In the Palette, click Done to return to the Blocks On This Page view.
- At the upper right, click the Publish button. The Select a Domain dialog appears. For this tutorial we will be using the default Use Our Domain selection and choose one of the domains supplied by ONTRAPORT.
- The first text box is for the subdomain; this is a good place to put your brand or company name if it is available. The second text box is a drop down selection box for one of the regular or secure domains supplied by ONTRAPORT. The third text box is for an optional file name.

- After making your selections click the Save & Publish button. An easy way to visit the new page is to click the Publish button again and click the Current Hosting: URL. Your new opt in page will display in a new tab.
- Follow the instructions in the section below called Recreate Your Automated Processes Using the Campaign Builder before inserting your form code on your website.
Recreate Your Email Templates Using Our HTML Email Editor
When recreating your email templates we strongly recommend selecting the ONTRAmail editor and creating a new email. This is much easier than copying the email from your current CRM solution and having to change all of the embedded links and images that they include. However, if you're committed to converting an exported HTML email template, below are step by step, detailed instructions to do so:
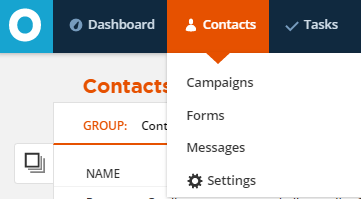
- In ONTRAPORT, click Campaigns > Messages and click the New Message button.

- Select the HTML Email editor.

- Click the Source button and right click, and paste, the HTML code into the page.

- Click the Source button again. The email is rendered in the editor window. Right click on the first image and select Image Properties from the drop down.

- Right click and copy the image URL in the URL field, then click the Select Hosted Image button next to that field.

- On the Insert Image dialog, click the Upload tab, and paste the image URL into the Enter URL field. Then click Go.

- ONTRAPORT will copy the image from your previous CRM's server and store it on the ONTRAPORT server, then return you to the Browse tab of the image manager. Click on the image and click the Select Image button. Click the OK button on the Image Properties dialog to return to the email. Repeat this process for each image in your message template.

- After editing your email, be sure to click the Copy from HTML button below the HTML editor window to create a plain text version of the email. This is a best practice to avoid your email hitting the spam folder!

- Name your email (1), using a naming convention prefix such as "NE:" and indicate it is a template. Give it a Subject Line (2) and then click Save (3).

- Using this email as a template: The HTML Email editor does not use templates. To create a new newsletter from this email, go to Contacts > Messages and select the email, then click Copy. Rename the copy of the email and edit the copy for your new broadcast.

Recreate Your Automated Processes Using the Campaign Builder
In ONTRAPORT, you will convert most of these to Campaigns, with send an email and wait elements being the most common replacements.
There is no way to directly import your previously created automated processes, so we recommend opening your previous CRM and ONTRAPORT account in separate browser windows so you can re-create the automations as elements in Campaigns in ONTRAPORT. This example shows how to re-create a simple welcome message automation as a Campaign.
- Open your previous CRM in one browser window and open the section containing your automation.
- Open ONTRAPORT in a new browser window. Navigate to Campaigns and click the New Campaign button. You may also add to an existing Campaign.
In ONTRAPORT, Campaign elements such as Triggers and Goals can specify what actions the new contact automatically receives. This allows a ton of flexibility in designing specific follow-up for specific forms. - Name the Campaign related to the automation/list you're migrating. You may also wish to add a note that the Campaign is adapted from your Welcome Automation.
- Add a new Trigger element or modify an existing one.

- Click the + Add Trigger button.
- Select "Contact Submits a Form" for the Trigger. Use the dropdown to select the ONTRAform or Smart Form block on the ONTRApage you created.

- Adjust the Settings including:
- Which Contacts can activate this trigger (most often this will be any contact in account)
- If a trigger is activated and the contact is already on this campaign map (many choose add here again when triggered)
- If the trigger can only be activated once per Contact (Most leave this unchecked. Only select this checkbox if the form fillout should be limited to the first time the form is filled out).

- Below the Trigger on your Campaign map, add asend an email action element. Adding the element directly below the Trigger sends the immediately immediately. Wait elements take the place of the corresponding option in your previous CRM. You can choose to use an email you've already created in your ONTRAPORT account, create a new one or copy your Welcome message from your previous automation.

- To select an email you've already created in ONTRAPORT, use the pulldown and select the email message with you wish to use. Skip to step 11.
To create a new message in ONTRAmail, select +Create New Message under the "Send Contacts this Email" pulldown. Enter a message name and click the Save and Edit button to create the message now. For instructions on creating an email using ONTRAmail, see this article. Once the message is created, skip to step 11. - We recommend selecting the ONTRAmail editor and creating a new email. This is easier than copying the email from MailChimp and having to change all of the embedded links and images that MailChimp includes. To convert a Mailchimp email message, allow extra time and follow steps 1 - 10 under Recreate Your Email Templates Using Our HTML Email Editor, then complete the process by:
- Clicking the Save button at the upper right to save the new message. After a short delay you will return to the Email element on the Campaign map.
- Click the Save draft button at the upper right to save the new Campaign.
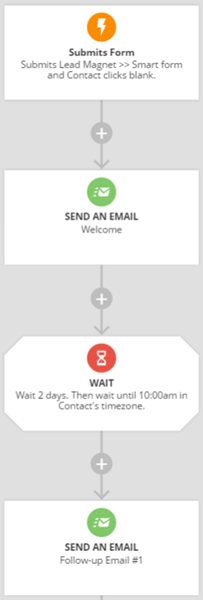
- Continue adding other Campaign elements until your follow-up process after a form fillout is complete. If you'd like to "drip" other communications out over time, add Wait elements in between your emails. The example below shows a welcome email that fires immediately after the form is filled out, a wait for 2 days until 10am in the Contact's timezone, then a follow-up email.
- When you're ready to go live, click the save and publish button. Test the campaign by filling out your form to ensure the Campaign is added to the contact record and the welcome email fires.
Export From Your Current System
Below are a few help articles for exporting from some of the most common platforms:
Import Your Contacts into ONTRAPORT
- Login to ONTRAPORT
- Go to Contacts > Settings > Import Contacts.

- Be certain your file is a .CSV file. We do not import XLS or other formats.
- Step 1 of 5: Drag your CSV file into the grey box or click Browse Computer to upload the file

- Step 2 of 5: Check the Don't include header row (Will not be imported) box if the first line of your CSV file includes the field names such as First Name, Last Name, etc. Then click Next: Import Settings. Look at the display to verify that the file will import correctly. You should see the individual fields in columns, with at least three lines of records displayed. If all the content is on one line and in one field verify the CSV file is formatted correctly.

- Step 3 of 5 has three distinct sections, the Duplicate Contact Manager, the Merge Settings, and the Usage Agreement.
- In the Duplicate Contact Manager section select your merge preference. This setting determines what happens if an existing Contact Record is found during import.
- Merge and underwrite with new imported data (default). This setting does not change any data already found in the existing record, but will add any new data. For example, if the existing Contact Record does not have the phone number, but the record you are importing does, ONTRAPORT will add the phone number to the existing record. This is almost always the setting you will use when importing contacts, especially if you are importing "lists" from other email service providers such as MailChimp or AWeber.
- Merge and overwrite with new imported data. This setting will update fields with the data in the import when a matching Contact Record is found, even if data is already in that field. If the existing Contact Record has a phone number in it, and the imported record has a different phone number, the import will overwrite the existing data and the newly imported phone number will be written to the Contact Record. You cannot reverse this action easily, so use with caution. An example use of this feature is a mass update of an area code in a phone number. You can export contacts with the old phone number, use Excel to update the area code portion of the phone number in the CSV file, and then import the file using merge and overwrite
- Create New Entry. This setting will always create a new entry for each record in the import file. This can lead to duplicate Contact Records; ONTRAPORT allows you to override the built in protections against creating duplicate Contact Records by importing Contacts with this setting. Use this setting with caution, as deleting and merging duplicate records is a manual process. Importing Tags is the one exception to the above settings. In all cases imported Tags are added to the Tags the Contact has, even if the contact already has other Tags.

- Merge Settings: Select which field to use to merge contacts with if a match is found in your database. The E-Mail field is selected by default, and is the recommended setting

Checking the box next to Import these Contacts with bulk mail set to 'Transactional Only' is very rarely used. This will prevent you from sending the contacts bulk email, and can only be reversed by the contact opting in again. An example of the proper use of this check box is if you are importing a list of contacts who have opted out and you want to market to them using Postcards or Facebook Custom Audiences to encourage them to opt back in. This can also be used to upload a "suppression list" or a list of contacts that have previously opted out - Usage Agreement: Read and confirm you understand the four items listed in the Usage Agreement by checking the check boxes. You are agreeing that all of the email addresses are from contacts expecting to receive email from you, that none of them are borrowed, rented or purchased and that you must maintain a bounce rate of less than 7% with complaints at less than 0.35%. The final check box reiterates our zero-tolerance in regards to spam. If you have a question about any of these requirements, please reach out to our Postmaster team at postmaster@ontraport.com.
- In the Duplicate Contact Manager section select your merge preference. This setting determines what happens if an existing Contact Record is found during import.
- When finished, click the Next: Match Fields button at the top right.
- Step 4 of 5: Select the Fields To Be Imported into ONTRAPORT. The fields in your import CSV are listed on the left. On the right, use the drop down boxes to select the ONTRAPORT Contact Record field you want to import the data into. To skip importing a field, click Select None. You can create a new field in the Contact Record if there is not already a match by clicking Create new field. If you have several files to upload from the same source check off the Remember My Selections check box for faster processing next time. When finished, click the Next: Add Rules button at the top right.

- Step 5 of 5: Add Rules To Your Imported Contacts (Optional). This step allows you to take actions on your new contacts as you import them. Click the + Add New Two common use cases are shown below:
- Add Tags to Your Imported Contacts. This use case is often used when importing contacts from a list-based email service. In some services you duplicate the contact in several different "lists" to segment your audience. In ONTRAPORT you only need a single Contact Record for each contact and you use Tags or other criteria to segment them. In this image we show a Rule to add the list name to the contacts so we can segment them later. This tag is added to all of the imported contacts.

- Add the New Contact to a Campaign. In ONTRAPORT, Campaigns are used extensively to automate actions. While you may not have any Sequences yet, this example adds the contacts to the a Campaign we have created to send a monthly newsletter. Don't worry if they are already in the Contacts database and on this Campaign; adding them again does not affect their current subscription or position in the Campaign.
- Add Tags to Your Imported Contacts. This use case is often used when importing contacts from a list-based email service. In some services you duplicate the contact in several different "lists" to segment your audience. In ONTRAPORT you only need a single Contact Record for each contact and you use Tags or other criteria to segment them. In this image we show a Rule to add the list name to the contacts so we can segment them later. This tag is added to all of the imported contacts.
- Click Finish and your import will start.
- Archive a copy of your CSV import file on your computer. The uploaded file will be visible in the import section for up to 60 days, and is then deleted.
Create Segmented Groups for Your Newly Imported Contacts
Once your Contacts have been imported into your ONTRAPORT account, you will use "Groups" to view and manage them.
ONTRAPORT's database system allows you to segment your contacts using Groups. Groups are dynamic and automatically update when the contact qualifies to be a member of the Group, or no longer meets the criteria for the Group. This article explains how to use Groups to get an up-to-the-minute view of your contacts.
Think about Groups as if they were 'saved searches.' You're basically setting up a search for all contacts that meet certain criteria, then saving that search so you can go back to it whenever you like. For example, you could create a group of all contacts who live in Canada. The criteria of this group would be based on the country field of the contact record.
- Go to the Contacts collection
- Click on the Group pulldown menu and select + New Group

- Name the group
- Select a group permission to limit who can view or edit the Group.

- Set the group condition(s):
- Choose a field, condition, and value for each group criteria you add.
- To add another value to a group condition, click the + Add Value button.

- To add another group condition, click the + Add New Condition. button.
- Click Save
- Verify your new Group contains the data you want.
Other Resources
ONTRAPORT Projects get you up to speed quickly. Select a project and the training module will walk you through the process step-by-step. You can pause and come back at any time, and using the training program does not interfere with using ONTRAPORT, making it ideal for both beginning and advanced ONTRAPORT clients. Make sure ONTRAPORT is open in another tab then click on the following links to see the Projects in your account:
FAQs
Q. What if I still have customers running through an autoresponder or sequence on my old system?
A. We recommend letting any remaining subscribers run through the autoresponder on your previous system until they've completed the automation.
Comments