
Facebook Comments Element
About the Facebook Comments Element
Applies to: ONTRAPORT Plus and above.
The Pages Facebook Comments Element requires a Facebook App to allow your customers to make comments on your Pages using their Facebook credentials. They can optionally post their comments to their own newsfeed, creating some social media buzz for your page.
Note: Facebook routinely "split tests" their pages so the images and descriptions shown here may not match your version of Facebook. Search for the content we describe to find the location of the feature on the Facebook page.
Setting Up Facebook Comments
Drag and drop the element where you would like the Facebook Comments feed to appear. You have to create a Facebook App and obtain the App ID to configure this block. We recommend you create the page first and insert the App ID as the last step before publishing.
Create the Facebook App
Follow these instructions step by step. Do not fill in any other fields, submit the app for approval, etc. Because this is a complex process, you may want to enlist the help of an ONTRAPORT Certified Consultant to complete this step.
- Log into your Facebook account.
- In the URL, replace the "www.facebook.com" with "developers.facebook.com" and press enter.

- Click the My Apps drop down at the top right and select Add a New App. Note, the My Apps drop down is next to your profile image, and may appear at the top left instead of the top right. Facebook split tests their pages frequently and we cannot determine which version you will actually see.

- Click the icon with WWW in the pop up. This is usually found on the right after the three icons for "iOS", "Android" and "Facebook Canvas". The order may be different in your account.

- The "Quick Start for Website" dialog box will pop up.
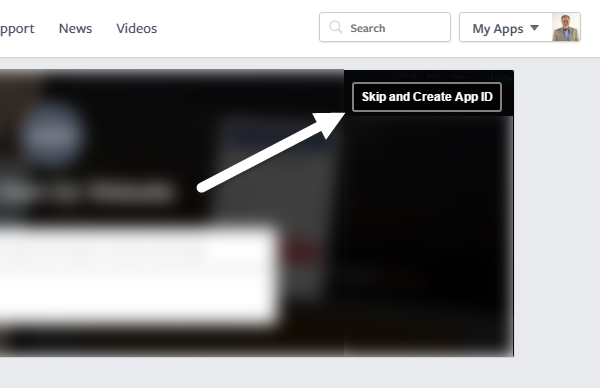
- Click the Skip and Create App ID button. It is usually found at the top right, but the look and location may be different in your account.
- Enter a name for your new Facebook app. Facebook does not allow you to use the word "Facebook" in the name, so let's use "ONTRAPORT Pages Comment Block" for now.
- Leave the optional "Namespace" field blank.
- Leave the "Is this a test version of another app?" setting at the default of No
- Select Business in the drop down for "Choose a Category".

- Click Create App ID in the bottom right or left corner. It may also be located at the top right of this dialog box.
- On the next screen search for the Dashboard menu item and click it. It usually appears at the top left, but the column may appear on the right. It can have either a light or dark colored background.

- Copy the App ID number in the Dashboard to a text file for use later in ONTRApages.
- Click the Settings menu item. It should be located under "Dashboard" in the column on the left or right.
- Click the + Add Platform button at the bottom of the pop up and click on the Website icon.

- Paste the URL used to publish your ONTRApage into the Site URL field and click the Save Changes button at the bottom right.

- Click the App Review menu item in the left or right column. At the top of the page that loads you should see the "Make ONTRApages Comment Block public?" dialog (this will use the name of your app set in step 7). Click on the "No" icon, confirm that you want the app to be available to the public, and the No icon should now read "Yes":

- You are now finished with the configuration. Do not fill in any other fields, submit the app for Facebook approval, etc. In most versions of the developer site you can simply log out by clicking your profile image at the top right (or top left) and selecting "Log Out".
Configure the Facebook Comments Element
The only information you need from the Facebook app is the App ID number obtained in step 13 above. Open the Page for editing and click on the Facebook Comments element to expose the Settings. Paste the App ID into the text block. Leave the Comment URL field blank to have ONTRAPORT complete the published URL when the page is published. On the Style tab you can set the color theme, number of comments to display and a sort order for the comments.

Articles in this section
- Pages Elements - Overview
- Using Form and Sales Elements
- Add Order Forms to ONTRAPORT Pages
- Adding Order Bumps and Upsells to Pages
- Adding Products to Sell on Pages
- Blocks, Columns and Rows
- Editing Images for Pages
- Pages Best Practices
- Pages FAQs
- Publishing Your ONTRAPORT Page
Comments